
How I Rebuilt My StopTech Trophy Calipers Before It Was Too Late
|
|
Time to read 5 min
|
|
Time to read 5 min
Somewhere between braking deep into Turn 1 and rolling through traffic on the highway, your brakes are silently begging for a little attention. I found this out the hard way mid-season, when I noticed the pedal feel starting to fade -not bad...just off. And if you’ve driven enough laps, you know that “off” usually means “time to tear it down before something sends you into the gravel.”
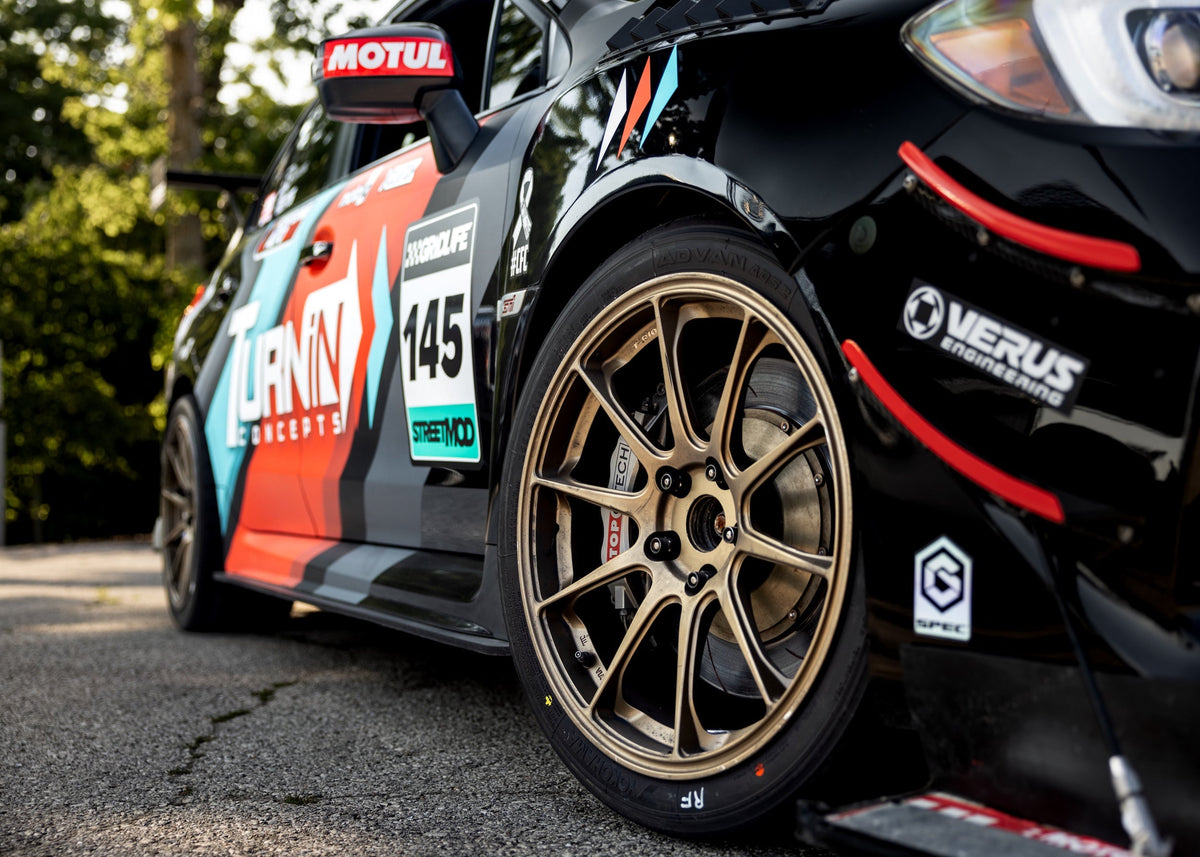
So, I pulled the StopTech Trophy calipers off my Time Attack Subaru and decided it was time to rebuild them. After all, we’ve run multiple events, the brakes have seen everything from Lime Rock to Laguna Seca and now we’re prepping for Road America - they definitely earned some fresh seals. If you’ve never serviced your calipers before, here’s how it goes-and honestly, it’s a pretty straightforward job once you get into it.
To start, get the car up on stands and yank the wheels off. You’ll want to disconnect the brake line next (take a mental note of how you have this routed now) but be smart -put a rag or drip tray underneath so you’re not sending fluid all over your garage floor or, worse, your paint. Be sure to grab some fluid line stoppers, (you can get them on amazon), so you don't run the brake reservoir dry…that's not a fun time and will require a lot more work. Once that’s out of the way, remove the bridge bolts, pads and then caliper from the bracket. Then comes the fun part: popping the pistons out. This is where you will need a rubber-tipped air nozzle and some gentle air pressure -like 30 to 40 psi. You’re aiming for smooth movement, not launching pistons across the shop, which would damage the pistons among other things. I always shove a wood block or thick rag inside the caliper to catch them. If one side is stubborn, block off the others with clamps and work them one by one.
With the pistons out, you’ll see two grooves in each bore-one for the pressure seal and one for the dust boot (Note: race calipers usually don’t have dust boots). Use a plastic or brass pick to carefully pull them out. Be careful not to gouge anything. You’ll be kicking yourself if you score the bore and have to start chasing replacement parts mid-service or worse…replace the whole caliper.
Now’s the time to inspect everything - Look at the pistons, if they’re scratched, cracked or pitted, you might need to replace them. As you can see in the pictures here, mine were very beat up and luckily my partners, Counter Space Garage and GiroDisc were able to provide me with twelve new pistons! If the bores have rust, corrosion, or any heat-related weirdness, now is the time to deal with that too. Be sure to give everything a good clean with non-chlorinated brake cleaner and lint-free rags, then blow air into the seal grooves to get rid of any trapped debris.

Once everything is clean, grab your new seals and lube them up with some fresh brake fluid. Seat the pressure seal in the inner groove and the dust boot in the outer groove. These should sit flat and smooth-if anything looks twisted or bunched up, stop and fix it now before the wall at a track day reminds you that you didn’t.
To reinstall the pistons, coat them lightly with brake fluid and press them in straight with your hands. You’ll feel some resistance as they pass through the seal -that’s normal. If it binds or feels crunchy, pull it out and double-check the seal. It should slide in smoothly after the initial press but, don't force it. The last thing you want is to nick the new seal and start over.
Once the pistons are in, you can now put the caliper back on the bracket and torque them (around ~80-100 ft-lbs). In goes the pads, bridge bolts get torqued to spec (StopTech usually says ~20–25 ft-lbs), and then you can hook the brake line back up. Double-check that your routing looks like it did earlier, and the tire isn’t interfering.
Bleeding the system is next. Split style calipers can have multiple bleeder screws but always it’s both sides (inside and out). In my case, we have two bleeder screws on the top and we will be working from the inside bleeder screw ( closest to the body) first and then doing the outside - it’s important to start with the caliper furthest away from the reservoir and work your way around till you get to the one closest last. I use Motul RBF700 or Castrol SRF depending on what I’ve got in the shop. Bleed until there are no bubbles and the fluid runs clean. If your pedal still feels soft, keep going. If it still feels soft, it might be air trapped in a caliper you didn’t bleed fully. Ask me how I know. Quick tip if you do have trapped air bubbles: use a rubber mallet to tap on the caliper which will help release trapped air bubbles. When bleeding brakes it’s good to have a buddy help or a vacuum bleeder to make your life easier.

Now for the part people always ask - how often should you do this? Well, if you’re racing, I check the calipers every 2 to 4 events. It’s recommended see any weird pad wear or the dust boots (if you have them) are starting to crack and if so it’s time to rebuild. For a full rebuild with seals and all? Every 8 to 10 track days if you’re pushing the car hard. If you're just daily driving with the occasional spirited run, once every couple years is probably fine. But bleed your fluid at least once a year, minimum. Bleed more often if you like living on the edge or doing repeated canyon runs.
Quick side note for anyone running something other than StopTech-this general service process applies to a lot of other high-end calipers too. AP Racing, Brembo, Wilwood, Rotora, Endless-most of them are pretty similar inside. Some, like Brembo, might have more proprietary parts or prefer you send them back for service, but the piston/seal/cleaning process is basically the same. So even if you’re not on StopTech, this guide will give you a solid idea of what to expect.
The thing about braking systems is, they’re not glamorous but when you mash the pedal at 150mph, and it holds -that’s when it matters. A fresh rebuild makes the pedal feel like new, improves consistency under heat, and helps you trust the car again.
So yeah-don’t skip this. It’s not that hard and It’s not that expensive. Now get out there and service those brakes - your future self will thank you.
Devin Hofmann - Contributing Writer/Driver/Engineer
Hofmann is a solutions-oriented motorsports and manufacturing engineering professional with 4 plus years of industry experience. She lives her life as a dedicated driver, engineer, and passionate enthusiast who is always willing to educate and inspire. Devin has quickly built a reputation for quick learning, and effective problem solving. She has an impressive background in auto racing and a passion for mechanics.


